A Step-by-Step Guide to Decentralized Assets
Table of contents
- How to create a Vault
- How to add collateral to your Vault
- What can I do now with my dTokens?
- Liquidity Mining
- Repaying your Loan and closing your Vault
After you have already familiarised yourself in detail with the theoretical framework of decentralized assets in our last article, we now want to put it into practice. Therefore, we will now take you on a journey through the new DeFiChain mobile app, where we will show you how you can create dTokens through the use of Vaults and how to make them work for you (more information on Vaults can be found here). Alternatively you can also watch the following video:

Before we start, please make sure that you use the latest app version -- the current version on iOS is 0.17.1. To unleash the app’s full potential and to make sure that all functionalities work fine, your app always has to be up-to-date. When you start the app for the first time, you will certainly notice the new "Loans" button in the footer of the app, between "DEX" and "Transactions":
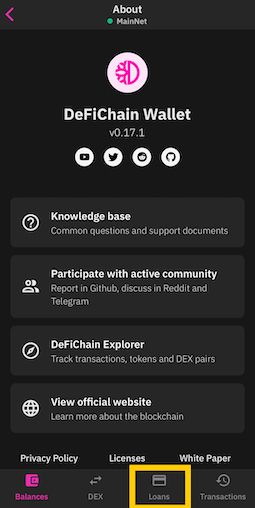
If you now click on the "Loans" button, you should see the following screen:
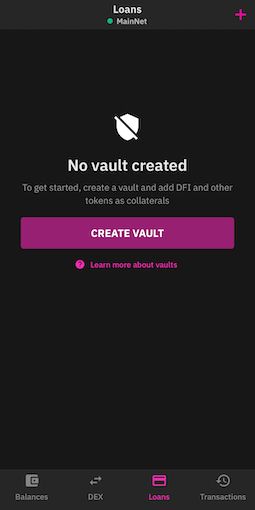
1. How to create a Vault
The previous image is basically the home screen you see when you first want to use decentralized loans on DeFiChain. As you’ve already learned in our last article, creating a Vault -- a place where you keep your coins -- is a prerequisite for creating (minting) decentralized assets.
So let's create a Vault right now by clicking the "Create Vault" button. Once you have done that, you should see the following screen:
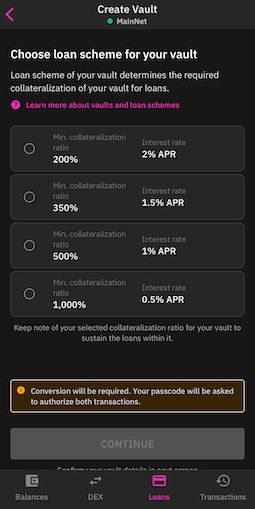
You will then be asked to select a loan scheme for your Vault. The loan scheme indicates the annual interest rate you have to pay for your loan and depends on the minimum collateralization ratio -- more on this later.
The loan is paid out in the form of decentralised assets, also called dTokens. Currently, you can create (mint) 16 dTokens -- the most prominent of which are dTSLA, DUSD, dGOOGL, dAAPL and many more. The whole list of dTokens can be viewed at Defiscan.live.
You can then either hold on to these dTokens, trade them on the decentralized exchange (DEX) or add them into liquidity pools to participate in Liquidity Mining and receive high returns.
The collateral ratio is the ratio between the collateral deposited into your Vault in the form of DFI, BTC, USDT or USDC and the sum of your decentralized assets (dTokens like dTSLA, DUSD, etc.) generated with the Vault -- so your collateral ratio is calculated by: The sum of your collateral divided by the sum of your generated dTokens multiplied by 100.
If you want to pay as little interest as possible on your loan, then you should choose a minimum collateral ratio that is as high as possible. But be careful that your collaterallization ratio does not drop below this threshold, because otherwise your Vault will be put into liquidation and subsequently will be auctioned off to the highest bidder, along with all its collateral. We will now proceed with the minimum collateralisation level of 200%.
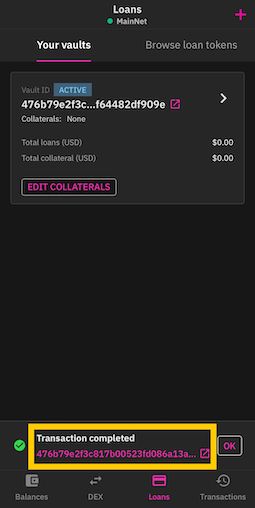
The creation of your Vault can take some time, as the Vault has to be created as a "transaction" directly on the blockchain. Once the vault has been created, you should see the following screen, in which you can see the confirmation message of the successful creation of your Vault in the footer:
2. How to add collateral to your Vault
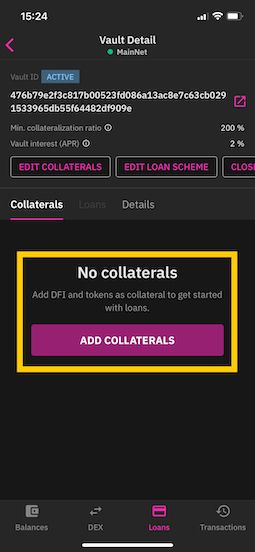
Congratulations! You’ve done it. You’ve just created your first Vault with just a few clicks. In order to use your Vault to create (mint) decentralised assets (dTokens), you have to first deposit collateral into your Vault (if you do not know what dTokens are, then please have a look here). To proceed, click on your Vault and add collateral by clicking on the button in the middle of the screen.
In the next step, you can add the following tokens as collateral to your Vault:

After you have selected the coin and the quantity, all there is left is to confirm the transaction. After the transaction has been confirmed, you will immediately see the coins in your Vault. Remember, that the sum of your transferred coins represents your collateral. Now you are ready to create decentralised assets (dTokens) against this collateral.
In order to do this, hop over to your previously created Vault and click on the second tab called "Loans".
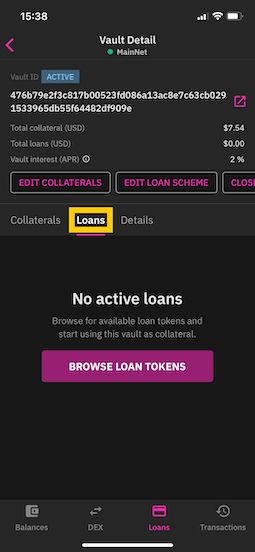
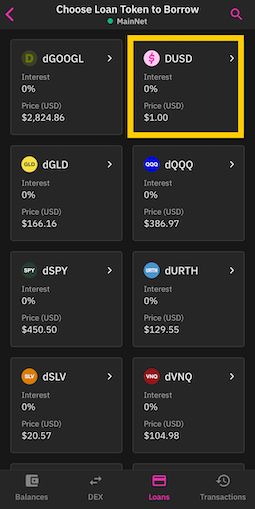
In the screenshot above you can see that you have not yet taken out a loan in the form of dTokens against the collateral in your Vault (if you want to know more about Loans on DeFiChain, then please have a look here). In order to take out your first Loan, click on "Browse Loan Tokens" in the middle of the screen. On the next screen, you will see a list of all the dTokens you can generate (mint) against your collateral -- once again, that is, the sum of all your coins in your Vault.
A comprehensive list of all mintable tokens can be found on defiscan.live. Defiscan.live also shows you the most important details, graphs and data about the DeFiChain ecosystem. Under DEX you can check i.e. the returns of your coins in Liquidity Mining, or you hop over to Oracles and check the prices for which you will create (mint) your dTokens.
For exercise purposes, we will now generate DUSD, i.e. the token that is used as the second token pair in Liquidity Mining for decentralised assets. Next, we click on the DUSD tile as shown in the screenshot below.
In the upper part on the next screen, you will see a summary of the most important parameters of the respective dToken.
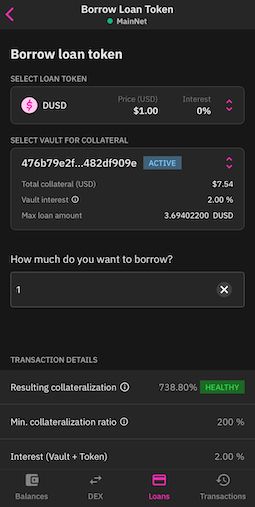
In the first line you can see the price at which you can create (mint) DUSD –– this price is taken from oracles and can be viewed on defiscan.live. Next to it you see the interest rate. In the block below you see the most important information about your Vault -- notably your total collateral, your vault interest rate (the interest rate you selected when creating the vault = interest rate of the loan scheme) and the maximum loan amount, i.e. the maximum value at which you can generate DUSD.
The most important input field on this screen is in the middle. Here you can enter the amount of DUSD you want to generate (mint) against your collateral. For exercise purposes, we will now generate (mint) 1 DUSD.
After you have entered the value, you will see the transaction details at the bottom of the screen. It is important to understand that the collateral ratio displayed depends on the amount of dTokens to be generated. It is also important to note that this ratio should never fall below 200% (= minimum collateralization ratio), otherwise your entire Vault will be auctioned off.
In our case, the collateralization ratio is 738%, which is more than three times as high as the minimum requirement of 200%. Therefore, we can proceed and generate (mint) 1 DUSD. To proceed, we scroll all the way down and click on "continue". This process may take some time as the transaction is validated directly on the native blockchain layer.
After the transaction has been confirmed, you will see the following details of your Vault:
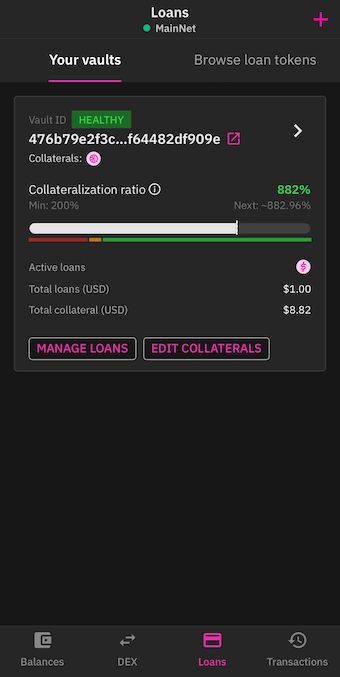
Here you can see at a glance what we have done in the previous steps. First of all, you see the created vault. You also see how much collateral you have put into your vault and how much of it you have used for the creation (minting) of dTokens.
The ratio of these two values is also illustrated graphically in the collateral ratio. It is important that you are in the green zone of the display, i.e. always above 200%, otherwise you run the risk that your Vault is being liquidated and auctioned off.
3. What can I do now with my dTokens?
In the previous step, we showed you how to create (mint) dTokens by using a Vault. In this step, we will now show you what you can do with these dTokens. Better fasten your seatbelt, because it will get really exciting and profitable ;)
The value of a dToken is determined solely by supply and demand on the decentralized exchange (DEX). However, this price will usually be close to the price of similar assets, traded on other (external) exchanges. In that sense, you can simply buy a dToken directly on the DEX and participate in the price potential of this token. Alternatively you can use it to trade on the DEX. You are probably already familiar with both use cases from actively trading stocks. However, there is now a third possibility: You can also put your dToken in Liquidity Mining.
4. Liquidity Mining
As you may already know from the previous Liquidity Mining, you can now also let your newly generated dTokens work for you -- a regular income, which is transferred directly into your address with every new minted block, is waiting for you =)
Compared to the previous Liquidity Mining with BTC, ETH, etc., the liquidity pools for decentralized assets are not powered by DFI as a second coin pair, but by DUSD. So if you buy dTSLA directly on DEX or mint it yourself as described above, then you also need DUSD to join the dTSLA-DUSD liquidity pool.
Similarly, you can now also invest your previously generated DUSD in the DUSD-DFI liquidity pool in order to benefit from the high returns. This is exactly what we will do now. To proceed, click on "DEX" in the main menu of your mobile DeFiChain Wallet and scroll down until you find the right liquidity pool.
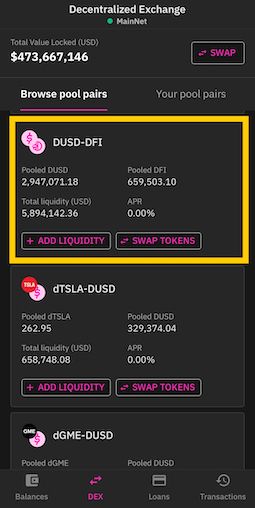
In order to participate in the DUSD-DFI Liquidity Mining Pool, you have to add your DUSD and DFI to the Liquidity Pool in equal amounts. To proceed, simply click on "Add liquidity".
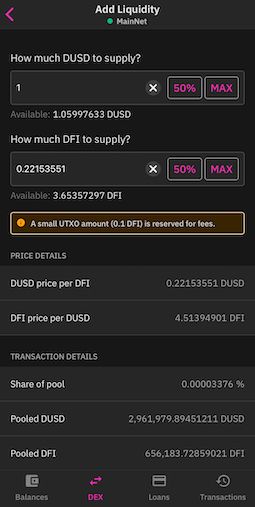
In the next step, you can enter the number of DUSD you want to add to the liquidity pool. The DFI amount will be calculated automatically -- so all you have to do is scroll down and click on "Next", and in a second step, confirm the transaction.
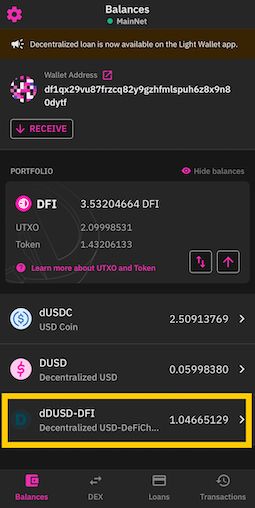
Voila! You have just put your first dToken into Liquidity Mining. From now on, you will receive regular Liquidity Mining rewards paid directly to your address. If you now click on "Balances" in the menu, you will see a new entry "dUSD-DFI". This is your share of the dUSD-DFI Liquidity Pool.
Wonderful! Now you have created a vault, transferred collateral into the Vault, and even created dTokens against this collateral. If the worst comes to the worst, you can always add more coins to your vault and create (mint) multiple decentralised assets to profit from high Liquidity Mining returns.
5. Repaying your loan and closing the Vault
If you want to pay back your loan and close your Vault, then proceed as follows:
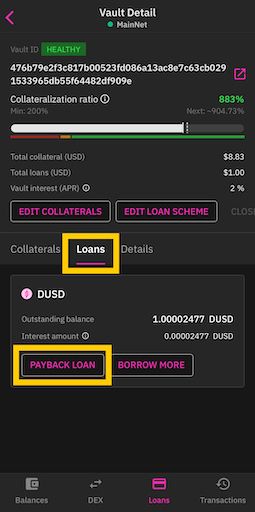
First click on "Loans" in the main menu and go into your Vault. Then click on “Loans” in the middle of the screen. Here you can now see your current loan including the interest that has been accrued since the creation of your loan in the form of dTokens. Now click on "Payback Loan" to repay your loan and subsequently close your Vault.
On the next screen you can set how much of the currently open loan you want to pay back. Since we want to close the Vault, we must first pay back the entire loan in the form of the minted dTokens plus the accrued interest.
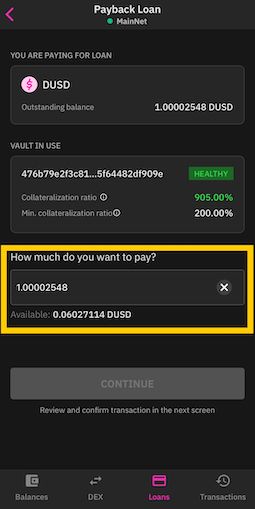
The total outstanding loan amount is already in the input field. Thus, we can continue with "continue" and confirm the payment in the next step. This process can take some time, since the transaction is performed directly on the native blockchain layer.
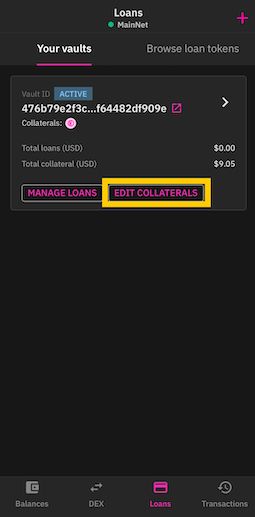
Lastly, we now have to transfer the collateral -- in our case 2 DFI -- out of the Vault. To proceed, we go back into the Vault and click on "Edit Collaterals" in the overview display.
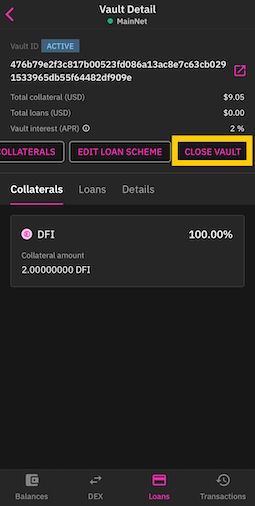
After having removed the collateral from the Vault, we can now close it. In order to do this, we go back into the Vault and notice that the Vault is empty and all the collateral has been removed -- so everything went according to plan and we are ready to close our Vault.
Now we go back into our Vault and scroll horizontally until we see the "Close Vault" tap and click on it.
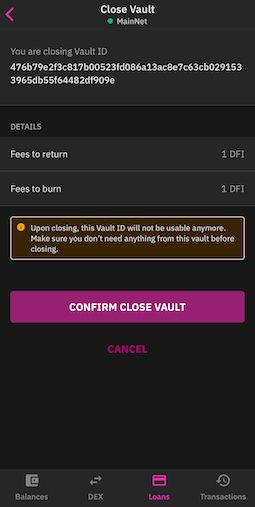
As the very last step, we now close the Vault by paying a fee of 1 DFI. Voila! Your Vault is now closed. After the transaction has been confirmed, you will no longer see a Vault under "Loans".
If this was a bit too fast for you, or if you still have some questions, then we would kindly like to ask you to check out the DeFiChain Telegram group. Our amazing community is always here to help you!